
The Sound of Clean
The rising volume of surgical procedures and the increasing complexity of medical instruments pose significant challenges for Sterile Processing (SP) departments. These teams must ensure thorough reprocessing of intricate devices while maintaining operational efficiency. Among the essential yet often underutilized technologies in the decontamination process is the ultrasonic cleaner. This tool is particularly effective for cleaning complex surgical instruments—especially those with lumens, hinges, or delicate components—that are difficult to reach through manual or standard automated methods.
Why all the noise?
Ultrasonic cleaners are widely employed in the reprocessing of medical devices due to their ability to effectively remove contaminants from intricate and inaccessible surfaces. This cleaning method utilizes high-frequency sound waves transmitted through a liquid medium to generate cavitation—a phenomenon characterized by the rapid formation and implosion of microscopic bubbles. These implosions produce localized vacuum forces that dislodge and remove soils from hard-to-reach surfaces such as box locks, lumens, and complex surgical instruments.
Cavitation serves as the primary mechanical action in ultrasonic cleaning. The size and intensity of the cavitation bubbles are directly influenced by the frequency of the ultrasonic waves: higher frequencies produce smaller bubbles, which are particularly effective at penetrating narrow or occluded areas that are otherwise difficult to clean using conventional methods. Ultrasonic cleaners designed for medical applications typically operate within a frequency range of 40 kHz to 132 kHz.
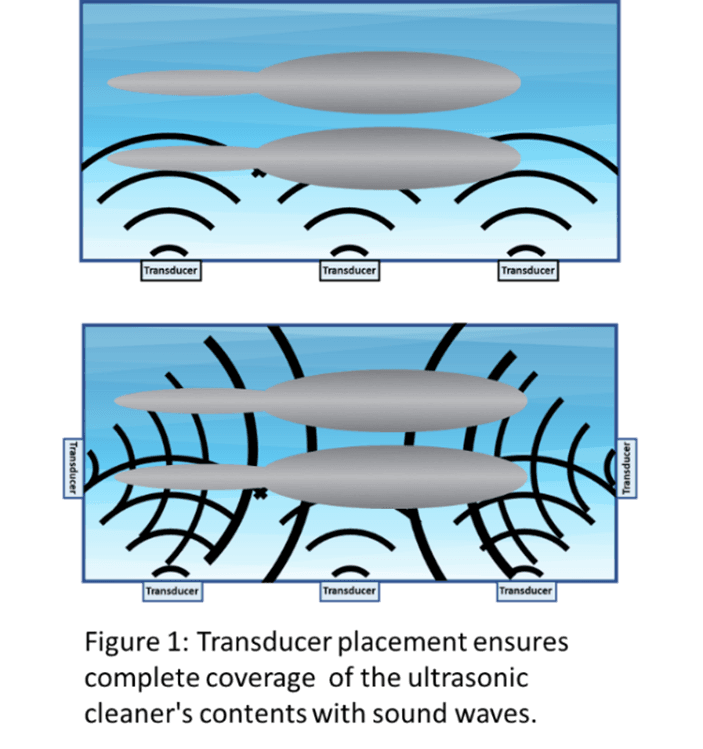
The generation of ultrasonic waves is facilitated by piezoelectric transducers strategically positioned around the tank of the cleaning unit. These transducers contain specialized crystals that undergo rapid expansion and contraction in response to alternating electrical signals produced by an internal generator. The resulting vibrations generate ultrasonic waves that propagate through the tank walls and into the cleaning solution.
The number and placement of transducers are determined by the size of the cleaning tank and the volume of instruments being processed. Multiple transducers are often employed to ensure uniform distribution of ultrasonic energy throughout the tank, thereby enhancing cleaning efficacy and consistency.
The Sound of Clean
Successful ultrasonic cleaning requires cavitation to remove soils, but it does not act alone. Cleaning solutions are designed to loosen the soil’s hold on surfaces. As cavitation pulls the soils from the surface, some formulations of cleaning solution suspend these soils and prevent them from redepositing on the device.
The cleaning solution must be low foaming as excessive foaming can interfere with the formation of cavitation. They usually have an optimal operating temperature. The ultrasonic cleaner must be able to maintain this temperature.
Effective ultrasonic cleaning is achieved through the integration of four key parameters: time, temperature, cavitation, and chemistry. The interplay of these factors ensures thorough decontamination of medical devices, particularly those with complex geometries and hard-to-reach surfaces
Challenges to ‘clean’
Many facilities experience several factors that impede the cleaning process. First, there is often a rush to get through the cleaning process—instrument inventory may be limited, staff members may feel overwhelmed by the workload, or the OR might be calling for a quick turn around on a specific device. Feeling pressure to get through cleaning quickly can cause SP technicians to cut corners, miss steps, or incompletely perform a step to move instruments along in the reprocessing cycle. While skipping steps may not be intentional, failing to follow the manufacturer’s IFUs may result in a device that is not clean.
Time: Many instruments have the same, or similar, instructions for use (IFU). This can cause sterile processing technicians to assume that the instructions for sonification will be the same for all instruments. One cycle time does not fit all instruments. Using the incorrect cycle time can lead to residual soils or damaged devices.
Temperature and Cleaning Chemistry: Many enzymatic cleaning solutions require precise temperature ranges to function optimally. Ultrasonic cleaners that are unable to maintain these temperatures, or are incorrectly programmed, may compromise the enzymatic activity and reduce cleaning efficacy. Temperature control is therefore a critical parameter in ensuring effective soil removal.
Cavitation: A single transducer failure could mean a cavitation “dead zone” in the tank. Transducer failures are often missed as the ultrasonic cleaner is still making noise and vibrations. Missed dead zones lead to poor instrument cleaning and the potential to pass on residual soil that could protect harmful microorganisms during sterilization.
Maintenance: Not maintaining the ultrasonic poses an unnecessary patient safety risk. As noted in ST79, ultrasonic machines should be cleaned daily and disinfected as required by the operator’s manual. Documentation of these practices should be incorporated into the process.
Check the drain screens for debris as well as any stray instruments that may have made their way to the bottom of the tank prior to the start of each cycle. Nothing should be on the bottom of the tank when the ultrasonic cycle is started as it can damage the machine.
Lumen flushing: Some instrumentation may require continual exchange of cleaning solution during ultrasonic cleaning. Flushing replaces the solution within the lumen providing “fresh” solution with a lower burden of residual soils. Traditional ultrasonic cleaners often used by SP departments do not have mechanisms to flush during cleaning. This can lead to residual soils and cleaning chemistries within the lumens.
Flushing lumens is particularly important for many of the robotic assisted surgical (RAS) arms and instrumentation. Not every ultrasonic cleaner is able to process robotic assisted surgical instrumentation. Those that do have validations that transfer some of the manual cleaning steps to the ultrasonic cleaner. Some facilities have struggled with ensuring consistent completion of manual steps when using these ultrasonic cleaners.
Keeping ‘Clean’ Commonplace
Keeping clean commonplace requires systematic performance evaluation and routine quality testing. The Association for the Advancement of Medical Instrumentation (AAMI) recommends three key approaches: (1) monitoring critical parameters such as time and temperature, (2) direct testing for residual soils on cleaned instruments, and (3) using test devices that challenge the cleaner’s efficacy.1
Direct testing involves sampling instrument surfaces and lumens for residual soils. ANSI/AAMI ST79 identifies eight potential soil markers, with protein, hemoglobin, and adenosine triphosphate (ATP) being the most common. However, aside from one FDA-cleared qualitative indicator, there are no standardized performance criteria for these tests.
Every cycle programed on the ultrasonic cleaner is tested upon installation, following major repair, and when changing the type or brand of cleaning chemistry. Daily testing using the facility defined test cycle should also be performed.
To ensure each ultrasonic cleaning parameter is being met, test devices should show passing results when the time, temperature, cleaning chemistry, and cavitation required to produce clean instruments has been achieved. This can present a challenge. Many marketed test devices evaluate time, temperature, and chemistry, but few test cavitation. Some tests look for cavitation alone. This means that to check each of the four parameters effectively, multiple types of test devices may be needed. Using multiple test device types increases costs and can give rise to confusion around test quantity and placement of tests in the ultrasonic tank. Some facilities have had difficulty accurately documenting the results for each test used. It is better to use an ultrasonic test device that checks for all four parameters—time, temperature, cavitation, and chemistry.
Test device placement is critical. To capture a nonfunctional transducer and/or crystal, test devices that detect cavitation must be distributed throughout the tank in areas where a cavitation “dead zone” would develop from a transducer failure. The positions within the tank will change between manufacturers and manufacturer models. Always refer to the ultrasonic cleaner’s instructions for use for appropriate locations to place cavitation detection test devices.
Though verification tests are an important part to ensuring the performance of an ultrasonic cleaner, there are currently no standards or recommendations dictating their performance characteristics with test performance between manufacturers being highly variable. One study testing four commonly used ultrasonic test devices demonstrated that three of the four tested showed passing results when exposed to rigorous shaking of the solution but no cavitation2. It’s important to evaluate the manufacturer’s supporting documentation to ensure appropriate performance.
Another key factor to consider is employee safety. Appropriate personal protective equipment (PPE) should be worn in decontamination each time the space is entered. This is especially important because the components of some available tests which mimic human blood and proteins are biohazardous. This means the test must be put in biohazardous waste after use which can be costly to dispose of in addition to presenting a safety hazard.
Facilities which keep equipment tests for their records, should be aware that failed test may contain biohazardous material making it an unsafe practice. An ultrasonic test device that uses non-biohazardous materials to challenge the washing process would be safer to handle, retained for documentation purposes without posing any risks, and could be disposed of in normal waste, reducing costs.
Finally, ease of reading the test results is essential. Identify and understand what could cause a false passing or false failing result. Some tests may be affected by water quality or cleaning chemistry properties. For example, hard water could cloud viewing windows. Cleaning chemistries that are not formulated to prevent redeposition of soil may require rinsing of the indicator prior to interpretation. Technicians must be trained to differentiate failures from contraindications from those of ineffective cleaning. Incorrectly interpreting a failed test as hard water clouding when it is a true failure of the equipment to clean could create a significant patient safety risk. Remember, an instrument cannot be sterilized if it is not clean!
Conclusion
Ultrasonic cleaning is a critical component of medical device reprocessing, but its effectiveness depends on the precise interaction of time, temperature, chemistry, and cavitation. Routine performance verification using reliable, comprehensive test devices is essential to ensure cleaning efficacy and patient safety. However, current limitations—including lack of standardized test performance criteria, variability among test products, and safety concerns with biohazardous materials—highlight the need for more robust, user-friendly, and validated testing solutions. Facilities must prioritize proper equipment maintenance, staff training, and the use of safe, effective testing to uphold the highest standards of infection prevention and instrument reprocessing.